4 minutes
Hashicorp Vault & Azure AD Identity Integration
Introduction
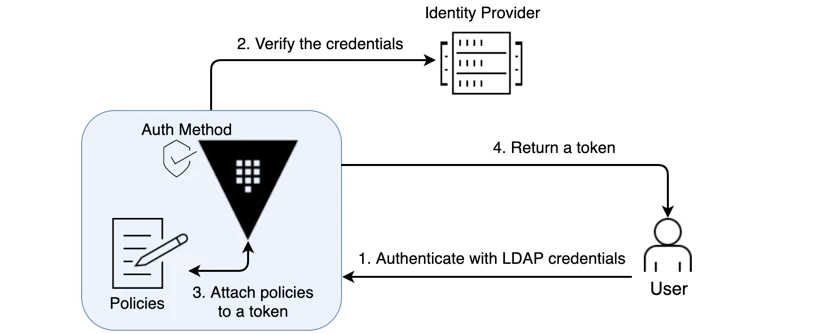
In this post, we will be implementing Hashicorp Vault authentication with Microsoft Azure AD as an identity provider using OIDC(OpenID Connect). The default token authentication is always enabled.
Configuration
There are two configurations that we had to do to achieve this with Azure AD, one is for app registration in the Azure Portal and the other one is on Vault - enabling the OIDC based auth. The steps for both are described below.
Azure AD App Registration
Navigate to Azure AD in the Azure portal and initiate a new registration under ‘App Registration’. Give a name to the app and select web under Redirect URI and add http://localhost:8250/oidc/callback and Register. We need to add more Redirect URI which we will do once the app is created. Copy the Tenant ID and Client ID(we will need those later). Under Authentication, we need to add Redirect URI based on the Vault URL. Create a secret and copy it for later use. We will also need to permit Microsoft Graph API Permission for “Group.Read.All”.
In short, we need the below from Microsoft Azure:
- Register 1 App under App registration in Azure AD with name vault-aad-auth
- web-based Redirect URI for the below URLs
- http://localhost:8250/oidc/callback
- https://localhost:8250/oidc/callback
- https://vault.x-ops.com:8200/ui/vault/auth/oidc/oidc/callback
- https://vault.x-ops.com/ui/vault/auth/oidc/oidc/callbac
- Create a secret and copy the value
- Copy the Directory(tenant) ID and Application(client) ID
- Microsoft Graph API Permission for Group.Read.All
Vault Configurations
enable OIDC
Enabling the OIDC based auth is the first thing we need to do, if you want to configure multiple OIDCs, we can change the path on which OIDC is initialized. Go to the Access tab at top of the Vault UI page and click on ‘Enable new method +’ under Auth methods, alternatively, you can use Vault CLI to enable this using the below command
vault auth enable oidc
configure OIDC
Post initializing the OIDC authentication, we need to configure OIDC using the below OIDC command, here we will need the Tenant ID, client ID, and secret that we created in the Azure AD App registration step. Replace the values in the below command before applying.
vault write auth/oidc/config \
oidc_discovery_url="https://login.microsoftonline.com/TENANT_ID/v2.0" \
oidc_client_id="CLIENT_ID" \
oidc_client_secret="SECRET_REDACTED"
configure role
Replace the vault URL in the below allowed_redirect_uris as applicable and only keep one among the last two depending on which port vault is exposed.
vault write auth/oidc/role/aad \
  user_claim="email" \
  oidc_scopes="https://graph.microsoft.com/.default" \
  groups_claim="groups" \
  policies=default \
  ttl=1h \
  allowed_redirect_uris="http://localhost:8250/oidc/callback" \
  allowed_redirect_uris="https://localhost:8250/oidc/callback" \
  allowed_redirect_uris="https://vault.x-ops.com:8200/ui/vault/auth/oidc/oidc/callback" \
  allowed_redirect_uris="https://vault.x-ops.com/ui/vault/auth/oidc/oidc/callback"
verify OIDC login with the above role
You can now try to log in using the above role via the below command or use the Vault UI with the OIDC method and role aad.
vault login -method=oidc role=aad
You will be authenticated to log in but won’t be able to see any credentials yet as policies are not yet set, which will be completed below
create two policy per team - read-only and read/write/delete
# admin policy for kv backend at path kv/
path "kv/*" {
    capabilities = ["create", "read", "update", "list", "delete"]
}
# read-only policy for kv backend at path kv/
path "kv/*" {
    capabilities = ["read", "list"]
}
Save the two policies in two files named - devops-admin-policy.hcl and devops-ro-policy.hcl. Use the below command to write these policies
vault policy write team-devops-admin-policy "devops-admin-policy.hcl"
vault policy write team-devops-ro-policy "devops-ro-policy.hcl"
create or select azure AD groups mapped to the two policies per team
Create two Azure AD groups and map the corresponding users as applicable and note down the Object(Group) ID for both the groups - one will be used for admin users and one for read-only users
create group mapping
Post group creation, we need to perform two tasks
- create groups in Vault and attach policies
- create identity mapping between the AAD groups and vault groups
internal vault group
vault write identity/group name="devops-admins" type="external" policies="team-devops-admin-policy"
vault write identity/group name="devops-ro" type="external" policies="team-devops-ro-policy"
Post execution, note down the canonical ID for both groups which will be used in mapping with
external AAD group mapping
# vault write identity/group-alias name="<azuread-group-object-id>" mount_accessor="oidc_mount_accessor" canonical_id="<canonical-id>"

# for admin group
vault write identity/group-alias name="7f8a791a-45ac-49a7-8883-406k2pfq844a" mount_accessor="auth_oidc_a26f03c3" canonical_id="383344sf-88x5-19s5-da01-9e0011foe9x3"

# for the read-only users group
vault write identity/group-alias name="7f8a791a-3222-cc33-8899-4061122b334a" mount_accessor="auth_oidc_a26f03c3" canonical_id="3883336f-8555-1aa5-dww1-9e1122xae9b3"
Now you can try to log in with the OIDC and role as aad; Provide your Azure credentials and you will be authenticated and if authorized will able to log in and view the authorized credentials.